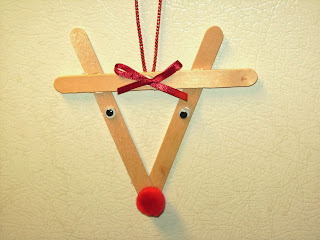
Craft Stick Reindeer
Supplies:
*Glue Gun
*Ribbon (Any color)
*Craft Sticks
*Glue-on Eyes
*Small Colored Pom Poms
*Newspaper to work on (Optional)
Instructions:

First, place a drop of glue at the tip of one of the craft sticks. Add another stick, forming a V with the tip placed on the glue.
Second, place one drop of glue on each stick - about one inch below the top.
Next, add the third craft stick by placing it on the two drops of glue (try to keep it center to the V- as you can see, I was a little off!)
Glue eyes on, just below the newly added craft stick. It's starting to come together!
Choose a Pom Pom. I went with red on this one. When I did this with the kids at church, they had a blast picking out what color nose to use! We had everything from Green, to Black to Purple!
For the hanging ribbon, I used a thin, almost string-like ribbon which had silver sparkle with a bright red. Cut it long enough that it can go over a tree branch to hang on the tree. Put a drop of glue on the cross stick and carefully push the two loose ends into the glue so that they will stay when it dries.
This next step is optional, but adds character and distinguishes between male and female reindeer. Using a thin ribbon, cut a small piece and tie it into a bow, and glue it to the top. Your reindeer is now complete!!! Wasn't that easy!
There are many variations to these reindeer, which makes them fun! Some that I want to try in the future are to paint the craft sticks a light brown first or maybe use a glitter paint to make it sparkle. The possibilities are endless!
One of these Reindeer ornaments has been on my family's tree since I can remember. They are too cute not to include on any Christmas tree, and the materials are cheap enough to make several at a time. They would make great gifts for kids to make for friends or relatives, such as grandparents. Don't forget to write the child's name on the back with the year they made it! It is sure to be a hit!
Merry Christmas!!!


